dotfiles github repo available
[link—standalone]I have made a github repo for my configuration files and some of my scripts, it is available at https://github.com/tzcrawford/dotfiles
Thu, 14 May 2020 14:37:09 -0700I have made a github repo for my configuration files and some of my scripts, it is available at https://github.com/tzcrawford/dotfiles
Thu, 14 May 2020 14:37:09 -0700
The following is a segment I added to my .vimrc to allow for easy copy paste to the multiple clipboards in Linux/X11/freedesktop systems.
In essence, these systems usually have two clipboards, PRIMARY and CLIPBOARD.
CLIPBOARD works as you expect from Windows; you highlight some text and CTRL+C copies and CTRL+V pastes.
PRIMARY works a bit differently, any time you select text with the mouse, it is added to the PRIMARY buffer; to paste it you use SHIFT+Insert or the middle mouse button.
I suggest consulting the wikipedia article on clipboards in the X Window System.
"LEADERS AND TAG SHORTUCTS
"I have set a leader key to be used to let vim know that I want
"to do some sort of custom remapped command, i.e. those just below this
let mapleader =","

"in visual mode copy/cut/paste to CLIPBOARD (freedesktop.org specification, CTRL+C/CTRL+V)
vnoremap y "+y
vnoremap x "+x
vnoremap p "+p

"in visual mode copy/cut/paste to PRIMARY (freedesktop.org specification, Highlight/Shift+Insert)
vnoremap Y "*y
vnoremap X "*x
vnoremap P "*p

"in normal mode copy/cut/paste to CLIPBOARD (freedesktop.org specification, CTRL+C/CTRL+V)
nnoremap y "+y
nnoremap x "+x
nnoremap p "+p

"in normal mode copy/cut/paste to PRIMARY (freedesktop.org specification, Highlight/Shift+Insert)
nnoremap Y "*y
nnoremap X "*x
nnoremap P "*p
In short, how this works is that you select text in visual mode and type , followed by y to copy the selection to CLIPBOARD.
Likewise , followed by Y to copy the selection to PRIMARY.
And likewise x or X to cut and p or P to paste.
Pretty convenient.
To reduce bandwidth or space on your HDD/SSD, it is useful to reduce the size of video. For instance some internet forums or image boards might limit video submissions to be very short (< 10MB). You can actually reduce the size of substantially long videos (several minutes) below this limit by reducing the resolution and bitrate. Obviously for high fidelity video, you want high video and audio bitrates, but in many cases, you can get away with as low as 32k and 64k bitrate for audio and video respectively. Usually, though, you probably want an audio bitrate of 64-128k at least, and a video bitrate as high above 64k as you can get. Lower bitrates will just compress the video more, and make it more pixelated-looking. In general, the file size = bitrate * video length in seconds. So if you had a 60s video at a 64k bitrate for both audio and video, you could expect a file size on the order of 60*(64k + 64k)/8 = 960 kB. Then again, resolution and framerate would both have to be taken into account. This script is pretty simple ffmpeg command, and doesn't do anything to reduce framerate. I should note that this script could be easily recreated or tweaked by studying the ffmpeg documentation. Additionally, it hasn't been prepared to take filenames that include a space in the title.
#!/bin/sh
#$1=input file
#$2=output file
#$3=audio bitrate
#$4=video bitrate
#$5=scale

ffmpeg -i $1 -c:v libvpx -c:a libvorbis -b:a $3 -b:v $4 -s $5 $2
echo "$(du -sh $1) --> $(du -sh $2)"
As an example, you might call this script with
~/path/to/script.sh ~/path/to/input.mp4 ~/path/to/output.webm 64k 128k 480x720
In my previous blog about i3wm, I had quickly mentioned that you can set the modifier key in your i3 config file with set $mod mod4 and later call $mod for your follwing bindsym keybindings.
Remember, this modifier key will tell your computer that you are communicating with i3 as opposed to some other application.
Generally people use the super key; this is the one that usually comes a Microsoft symbol on windows computer.
This is because Linux doesn't have a general use for this key unless otherwise declared by your desktop environment.
Some people opt to use the alt key(s) because they are close to the space bar and are easy to quickly hit with your thumb.
But, in the case where you are using the alt key for your modifier, you will conflict with any menu bar tool tips or alt key character entry commands.
For instance, you can navigate menu items in GUI application using your keyboard instead of your mouse.
As an example, you can open a new project in GIMP with the key presses of alt+f followed by n.
Here is what those alt key tool tips look like in GIMP, when activated:
Thus it may be worthwhile to swap the location of the alt and super keys on your keyboard.
I have accomplished this using a program called xmodmap (xorg-xmodmap)
The arch wiki provides some general guidance on how you could accomplish this, but I'll go in more detail here.
In short, I have written this script, and it works to solve the issue by simply calling it when I start i3:
#!/bin/sh
xmodmap -e "clear mod1"
xmodmap -e "clear mod4"
xmodmap -e "keycode 133 = Alt_L"
xmodmap -e "keycode 64 = Super_L"
xmodmap -e "keycode 108 = Super_R"
xmodmap -e "add mod1 = Alt_L Alt_R"
xmodmap -e "add mod4 = Super_L Super_R"
And in my i3 config, exec /path/to/keyboard/script.sh
Note this is different from using a .Xmodmap dotfile in my home directory.
I do this because unplugging or making changes to your keyboard can reset your configuration, and it is easier to simply rerun the script again than to source the dotfile with xmodmap ~/.Xmodmap.
In short, what is being done here is a series of commands telling xmodmap to execute a process.
The script erases the existing series of keysyms that are bound to the mod1 and mod4, assigns keysyms to a specific keycode, and reassigns the mod1/mod4 modifiers with the new keysyms.
You can see the existing list of keycodes and their associated keysyms with xmodmap -pke and which keysyms are bound to specific modifiers with xmodmap -pm.
It may be useful to pipe the results to a grep command to select out those that mention alt or super, etc.
For me, this involved keycodes 133, 64, and 108, although that may differ on different keyboards.
On the other hand, this remains true on all of the computers I own.
vim.
you don't want carpal tunnel syndrome.
?????
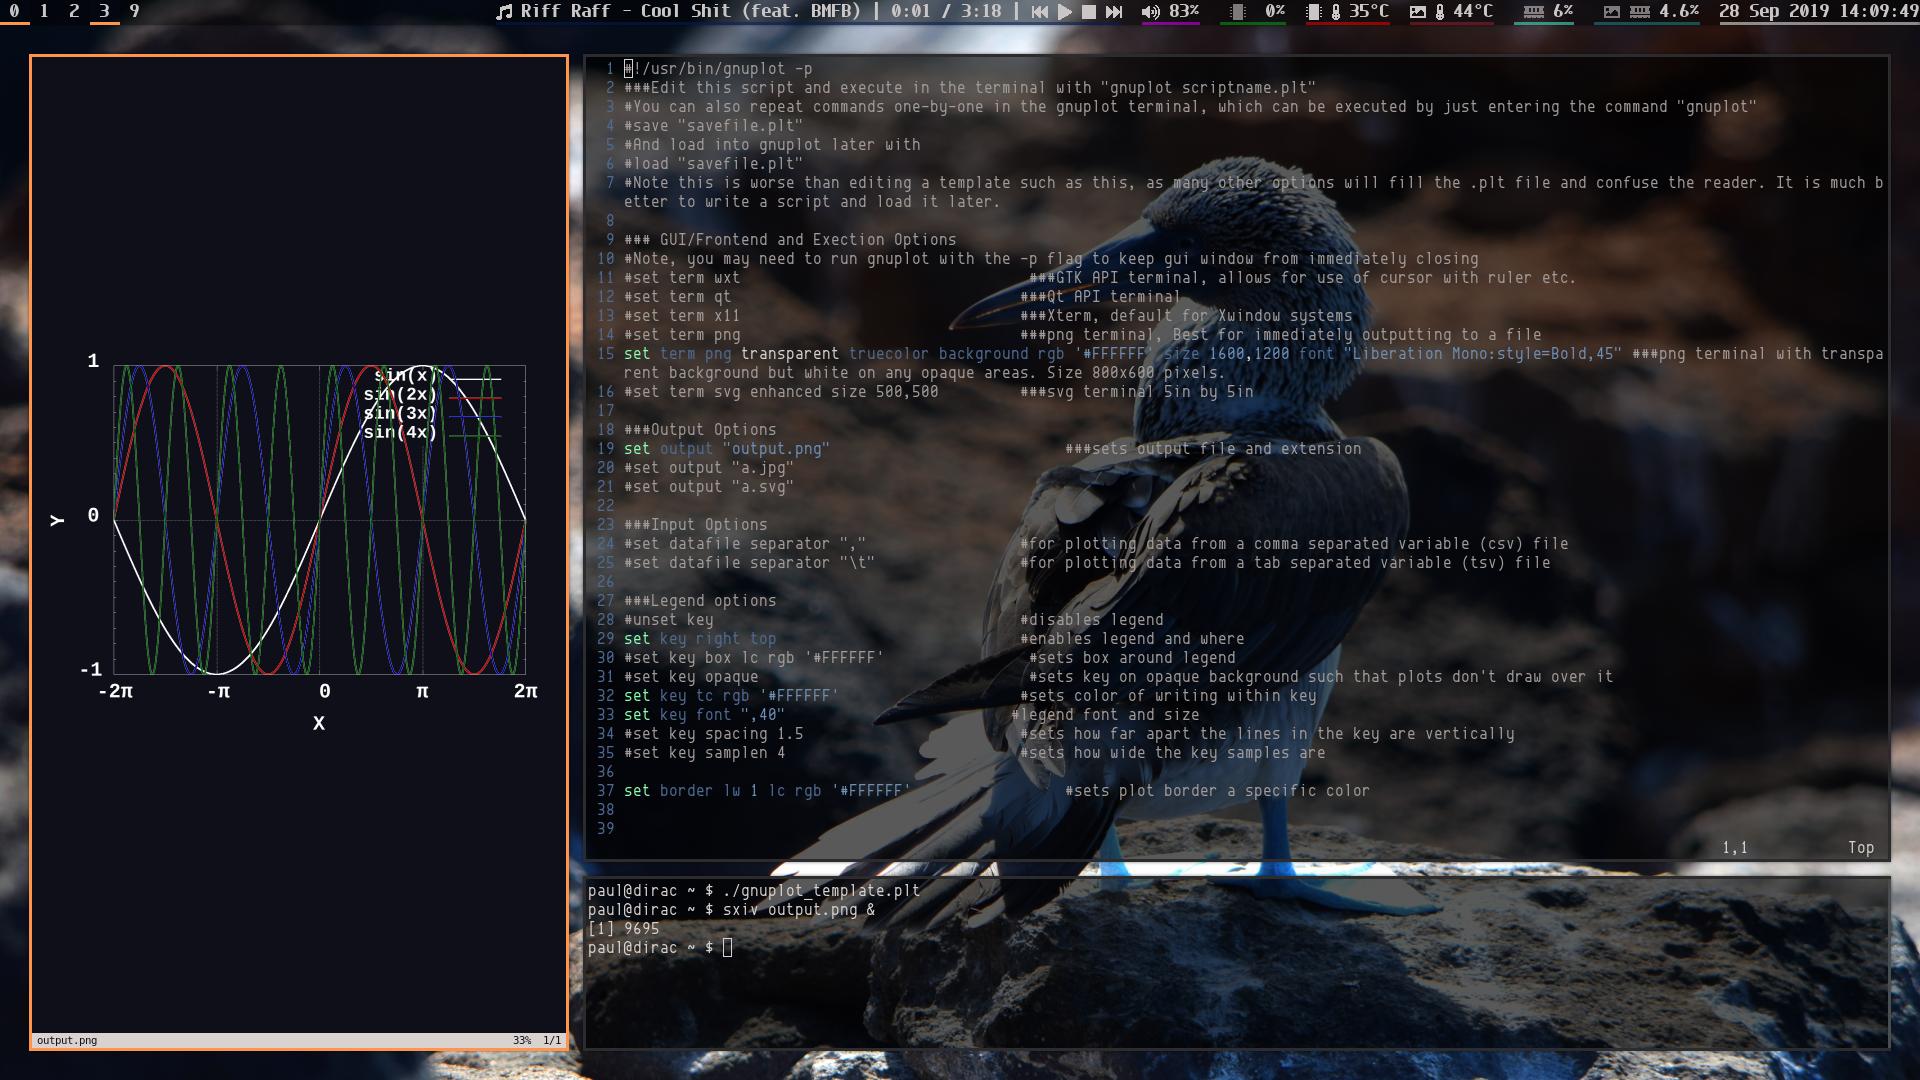
So, my original motivation here was to create an easy way to quickly generate transparent-background png images of equations that I could drop in LibreOffice impress when making presentations (or something similar). LibreOffice and Microsoft Office each have their own equation editors, but I have found latex to be much more extensible, efficient, and generally better looking. I realize LibreOffice has a latex extension, but I'm not really interested in using that if at all possible. In addition, I wanted the ability to easily convert this text to white because I tend to make presentations on a black background (and in some instances this is just a good option). There are a few ways you can accomplish this. For instance, GIMP is capable of taking the pdf files generated from latex and editing to the expected form, but that was too slow for me. The solution I ultimately decided upon involves compiling the latex into a postscript or pdf format and using imagemagick to convert to an image file with the intended properties. If you pack all these instructions in a simple shell script, the whole process becomes nearly instantaneous.
To make this solution work, you need to have imagemagick and a latex compiler installed. On Linux systems, you would generally use the TeX Live suite for latex complilation. As part of an aliasing workaround, I used texi2dvi to compile the tex and dvips to convert to postscript. In Arch Linux, imagemagick has its own package, TeX Live is available with the texlive-core package, texi2dvi is owned by texinfo (included in the arch linux base package), and dvips is owned by texlive-bin (a dependency of texlive-core).
Let's start with an example tex file with an equation in it, perhaps the Fermi-Dirac distribution.
\documentclass{article}
\pagestyle{empty}
\begin{document}
\begin{math}
\bar{n}_i = \frac{1}{e^{(\varepsilon_i-\mu) / k T} + 1}
\end{math}
\end{document}
\pagestyle{empty} such that when latex compiles, it only includes the intended text, as opposed to the whole area of a sheet of paper with a page number.
This significantly speeds up the time for the whole script, but we will remove extra "white space" later.
I'm going to save this tex script in fermi.tex for now.
Now let's start with the latex complilation.
Traditionally, we would probably compile the code with pdflatex fermi.tex using TeX Live.
I have experienced an aliasing issue using this compiler on one of my systems, but on another system, I had no issue.
Essentially what would happen is that using imagemagick on the resulting pdf file would always appear to be low resolution, regardless of any settings.
I eventually found a workaround which involved using GNU's Texinfo compiler.
First thing is to compile the latex code to the Device-Independent File Format (*.dvi), which is a binary representation of the typeset document.
This is done with texi2dvi fermi.tex
Next thing is to convert this *.dvi file to postscript (fermi.ps)using dvips: dvips -E fermi.dvi
In theory, we could just use texi2pdf fermi.tex, instead.
Overleaf maintains a page on compilers and conversion which may be worth referencing.
Now that we have a compiled pdf or postscript file, let's make it a png with imagemagick.
In the most simple case, we might get away with convert fermi.pdf fermi.png, but we'll throw it a couple options.
Firstly, you need to decide on an image size, which you can declare with the -depth option.
I like to have absurdly large images in the case I need to scale up the image, so I might give it something like 1200 dpi.
You can check the resulting image's size later using imagemagick's identify tool: identify fermi.png.
Next, you probably want to crop the image so only the text you care about is included, -trim.
And I like to turn the text white in some cases, -channel RGB -negate.
Finally, if you run the command just like this, imagemagick may spit out a warning convert: profile 'icc': 'RGB ': RGB color space not permitted on grayscale PNG.
You can suppress this with -colorspace RGB.
So in the end, we may end up with convert -density 1200 -colorspace RGB -channel RGB -negate -trim fermi.pdf fermi.png
Now, let's stuff everything in a script.
#!/bin/sh
FILE=$(echo $1 | sed 's/.\{4\}$//') #Removes the last 4 characters (.tex) so we can generate files with other extensions
pdflatex $1
#texi2dvi $1
#dvips -E $FILE.dvi
#texi2pdf $1
COMPILED=$FILE.pdf
#COMPILED=$FILE.ps
convert -density 1200 -colorspace RGB -channel RGB -negate -trim $COMPILED $FILE.png #convert to png
rm $FILE.aux $FILE.log $COMPILED $FILE.dvi #clean up unnecessary files
chmod 777 script.sh
./script.sh fermi.tex
Here's our result:

And this actually turns out to be extensible to larger blocks of text, and for multiple pages.

PS: For anyone experiencing security policy issues, there may be a bug involving ghostscript.
There has been instances in the past where the imagemagick project has changed the default security policy such that working with postscript of pdf may be disallowed.
A workaround may include manually changing these settings in /etc/ImageMagick-7/policy.xml
>inb4 i-if you want ur gay buttons go back to w10
current state of gnu/linux 2019
I'm not going into detail into why tiling window managers are awesome, that's already been done before. But I will attempt to help ease in the transition to i3 for those who are interested. For instance, I will share some details on reasonable configuration and some options and tricks that I have had success using. With this and future blog posts, I hope that the reader can gain some insight and build their own i3 configuration, which may look like setup, or completely different. It is true that this information already exists out there in some capacity, but having it condensed here may be helpful. With i3, this is how my desktop looks at the moment:
For those of you unaware, i3 is a GNU+Linux/BSD tiling window manager. The project's website cites that it is targeted toward advanced users and developers, although the software has exceptional documentation that is pretty easy to read. You will often see i3 shown off on image boards or the Unix Porn subreddit. While i3 can be configured to look quite aesthetic, the default configuration is incredibly ugly (well, simple). For most users, they tend to copy other people's configuration right away as opposed to building their own. This can be problematic in the same way as copying someone's .bashrc, you don't know exactly what each line in the configuration does, if you need it, or if it is going to do something you don't intend to happen. Thus, in writing blogs about this topic, I intend to inform users on ideas they can include rather than just dropping my whole dotfile on them.
I should also note that window managers are very different from complete desktop environments, and you shouldn't expect the exact same functionality.
Window managers simply communicate with your X server to manage where windows are located on your screen and how your user input affects their behavior.
Desktop environments (DE) contain all of the bells and whistles: widgets, status bars, lock screens, screen savers, default applications, etc.
With i3wm, there are no buttons attached to every window which allows you to close or minimize windows, that is all handled with the keyboard for maximum efficiency.
i3wm can come with some of the functionality of a DE, you can install i3bar and i3lock which are a default status bar and lock screen.
I do use i3lock due to it's simplicity, but I have been instead using polybar for a status bar because I like some of its included functionality.
In addition, there is no MS Windows-like "start menu" or dock where you can click to access the applications you typically use.
Instead, default i3 uses dmenu, a much simpler program whose primary purpose is just meant to handle user input.
In this case, dmenu is used to search for executables (I think just in /usr/bin) and execute them.
Both polybar and dmenu are hefty topics I'll have to cover some time in the future, but first, we should talk about some standard options of the main i3 configuration file.
I'm going to assume you've managed to install i3 and set up xorg to automatically start i3 when you log in (or you've figured out how to actually get i3 to start when you need it to, at least).
To configure it, you'll need to find and copy the default configuration file to an appropriate location, generally ~/.config/i3/config.
Note any i3 settings can be changed temporarily by executing a terminal process i3-msg ____(some line you'd put in the file)____.
Here you can start editing the existing structure to suit your needs, generally starting with the keybindings.
To understand how to handle keybindings, you should really read or learn about how to use i3 and how windows are moved around and sorted. You need to decide on a i3 modifier button (mod key). Holding this button will tell i3 that your key presses are meant to communicate with i3 as opposed to something else. Generally people pick either the super key (the one with the windows flag or something) or the alt key.
set $mod mod4j through ; keys, but I have remapped them to vim keys.
In addition, you can move floating windows with your mouse.
And you can also set a key binding to kill focused windows.
# change focus
bindsym $mod+h focus left
bindsym $mod+j focus down
bindsym $mod+k focus up
bindsym $mod+l focus right
# alternatively, you can use the cursor keys:
bindsym $mod+Left focus left
bindsym $mod+Down focus down
bindsym $mod+Up focus up
bindsym $mod+Right focus right

# move focused window
bindsym $mod+Shift+h move left
bindsym $mod+Shift+j move down
bindsym $mod+Shift+k move up
bindsym $mod+Shift+l move right
# alternatively, you can use the cursor keys:
bindsym $mod+Shift+Left move left
bindsym $mod+Shift+Down move down
bindsym $mod+Shift+Up move up
bindsym $mod+Shift+Right move right

# Use Mouse+$mod to drag floating windows to their wanted position
floating_modifier $mod

# kill focused window
#bindsym $mod+Shift+q kill
bindsym $mod+F4 kill
Another related thing to set is how you tell i3 how you want to sort the windows. With the container layout, you can change how you want child windows to be spawned, as a new tile or stacked/tabbed on top of the parent Additionally, you can move a tiled window into a floating position in front of other windows or just make it full screen. And you can tell i3 to spawn new windows vertically or horizontally. For some of these motions, you may need to tell i3 to focus on the parent or child container to get the exact setup you want. Here are my settings:
# split in horizontal orientation
bindsym $mod+n split h
# split in vertical orientation
bindsym $mod+m split v
# enter fullscreen mode for the focused container
bindsym $mod+f fullscreen toggle

# change container layout (stacked, tabbed, toggle split)
bindsym $mod+y layout stacking
bindsym $mod+t layout tabbed
bindsym $mod+u layout toggle split

# toggle tiling / floating
bindsym $mod+Shift+space floating toggle

# change focus between tiling / floating windows
bindsym $mod+space focus mode_toggle

# focus the parent container
#bindsym $mod+a focus parent

# focus the child container
#bindsym $mod+d focus child
Now you can set up how you want to manage your workspaces. What should they be named, how you would you switch your view to another one, and should they be forced onto a specific monitor. Generally each workspace has a number, but I have heard of people putting special characters, like a firefox character, in the title and leaving a specific windows (like firefox) on that workspace. You can also force workspaces to stay on specific monitors. Speaking of which, people have complained about multiple-monitor setups, but I've never had ANY issue. I have also included a section on additional workspaces, because I have often found myself needing more than 10.
#Workspace Names
set $ws0 "0"
set $ws1 "1"
    ... #fill the rest in here, I am excluding for the point of space
set $ws29 "29"

# switch to workspace
bindsym $mod+0 workspace $ws0
    ...
bindsym $mod+9 workspace $ws9

# move focused container to workspace
bindsym $mod+Shift+0 move container to workspace $ws0
bindsym $mod+Shift+9 move container to workspace $ws9

#Display. Note these will differ from computer-to-computer
#You may need to change this to reflect what you see on arandr
set $monitor1 HDMI-1
set $monitor2 DP-1

#pin workspaces to specific monitors
workspace $ws1 output $monitor1
workspace $ws0 output $monitor2
workspace $ws9 output $monitor2
workspace $ws10 output $monitor2
workspace $ws19 output $monitor2
workspace $ws20 output $monitor2
workspace $ws29 output $monitor2

mode  "Alternate Workspaces 1" {
        bindsym $mod+0 workspace $ws10
            ...
        bindsym $mod+9 workspace $ws19

        bindsym $mod+Shift+0 move container to workspace $ws10
            ...
        bindsym $mod+Shift+9 move container to workspace $ws19

        bindsym Escape mode "default"
        bindsym Return mode "default"
}
mode  "Alternate Workspaces 2" {
        bindsym $mod+0 workspace $ws20
            ...
        bindsym $mod+9 workspace $ws29

        bindsym $mod+Shift+0 move container to workspace $ws20
            ...
        bindsym $mod+Shift+9 move container to workspace $ws29

        bindsym Escape mode "default"
        bindsym Return mode "default"
}
#Select workspace mode w/ mod+~ key etc
bindsym $mod+grave mode "Alternate Workspaces 1"
bindsym $mod+Shift+grave mode "Alternate Workspaces 2"
Now, let's talk about resizing windows. I have always used the default resize function, it has worked for me. If you're using i3-gaps, you can also change the gap spacing.
# resize window (you can also use the mouse for that)
mode "resize" {
        # These bindings trigger as soon as you enter the resize mode

        # Pressing left will shrink the window’s width.
        # Pressing right will grow the window’s width.
        # Pressing up will shrink the window’s height.
        # Pressing down will grow the window’s height.
        bindsym h resize shrink width 10 px or 10 ppt
        bindsym k resize grow height 10 px or 10 ppt
        bindsym j resize shrink height 10 px or 10 ppt
        bindsym l resize grow width 10 px or 10 ppt

        # same bindings, but for the arrow keys
        bindsym Left resize shrink width 10 px or 10 ppt
        bindsym Down resize grow height 10 px or 10 ppt
        bindsym Up resize shrink height 10 px or 10 ppt
        bindsym Right resize grow width 10 px or 10 ppt

        # back to normal: Enter or Escape or $mod+r
        bindsym Return mode "default"
        bindsym Escape mode "default"
        bindsym $mod+r mode "default"
}

bindsym $mod+r mode "resize"

##### i3-gaps Configuration #####
for_window [class="^.*"] border pixel 3
gaps inner 15
gaps outer 15
#Gaps adjustment
bindsym $mod+s gaps inner current plus 5
bindsym $mod+Shift+s gaps inner current minus 5
bindsym $mod+z gaps outer current plus 5
bindsym $mod+Shift+z gaps outer current minus 5
bindsym $mod+F11 gaps inner current set 0; gaps outer current set 0
There are probably a few programs you want to start immediately after logging in or restarting i3. And we can also set key bindings for starting other programs quickly.
#Compton for Transparency
exec_always compton

#arandr/xrandr multimonitor control, may need this to get a specific resolution or handle how multiple monitors are placed
exec ~/scripts/xrandr_2monitor.sh

#Polybar
exec_always ~/.config/polybar/polybarstart.sh

#Pulse Audio Applet
#exec --no-startup-id ~/.config/i3/i3_pa-applet

#Network Manager applet
#exec_always --no-startup-id nm-applet


#Program Launcher
#bindsym $mod+F1 exec dmenu_run
# There also is the (new) i3-dmenu-desktop which only displays applications shipping a .desktop file.
#It is a wrapper around dmenu, so you need that installed.
#bindsym $mod+d exec --no-startup-id i3-dmenu-desktop
#bindsym $mod+F1 exec rofi -show run
bindsym $mod+F1 exec dmenu_run -i -l 15 -fn Monospace-18 -nb '#2c2c2e' -nf '#ff944d' -sb '#040404' -sf '#ff6600'

#reload the configuration file
bindsym $mod+Shift+c reload
#restart i3 inplace (preserves your layout/session, can be used to upgrade i3)
bindsym $mod+Shift+r restart
#exit i3 (logs you out of your X session)
#bindsym $mod+Shift+e exec "i3-nagbar -t warning -m 'Do you really want to exit i3? This will end your X session.' -b 'Yes, exit i3' 'i3-msg exit'"

#Applications
set $term urxvt
set $explorer thunar
set $browser qutebrowser --backend webengine

# start a terminal
bindsym $mod+Return exec $term

#lock screen
bindsym $mod+shift+x exec i3lock

#Screenshot keybindings
bindsym Print exec scrot
bindsym Shift+Print exec scrot -u

#video control
bindsym $mod+q exec arandr
#audio control
bindsym $mod+Shift+q exec pavucontrol

#printer control
bindsym $mod+p exec system-config-printer
#network control
bindsym $mod+Shift+p exec nm-connection-editor

#various program keybindings
bindsym $mod+e exec $term -e ranger
bindsym $mod+shift+e exec $explorer
bindsym $mod+w exec $browser
bindsym $mod+shift+w exec waterfox
And now for the fun part, let's set our aesthetic options. I use orange because it's usually pretty visible. You can experiment around with this to see what everything does. This should go without saying, but the #XXXXXX are standard hex colors.
#Default Colors
set $bg            #2c2c2e
set $fg            #9f9f9f
set $lo            #ff944d
set $hi            #ff6600
set $tx            #040404
set $ia            #8f8f8f

##### i3 Colors #####
#Window Colors
#                           border      background   text   indicator(i.e. where the next window will be tiled)
client.focused              $lo         $lo          $tx    $hi
client.unfocused            $bg         $bg          $ia
client.focused_inactive     $bg         $bg          $ia
client.urgent               $hi         $hi          $tx

##### Font #####
#for window titles. Will also be used by the bar unless a different font
# is used in the bar {} block below.
#font pango:monospace 8
# This font is widely installed, provides lots of unicode glyphs, right-to-left
# text rendering and scalability on retina/hidpi displays (thanks to pango).
#font pango:DejaVu Sans Mono 8
font pango:EnvyCodeR 12

##### Display ####
#I am using polybar, which is not configured here. But you could configure another bar with these.
###i3bar
# Start i3bar to display a workspace bar (plus the system information i3status finds out, if available)
#bar {
#        status_command i3status
#}

###i3blocks
#bar {
    #status_command i3blocks -c ~/.config/i3/i3blocks.conf
    #position top
    #mode dock
    #modifier None
    #colors {
    #    background $bg
    #    statusline $fg
    #    separator $lo
        #                   border          background          text
    #    focused_workspace   $lo             $bg                 $lo
    #    active_workspace    $tx             $bg                 $tx
    #    inactive_workspace  $ia             $bg                 $ia
    #    urgent_workspace    $hi             $bg                 $hi
    #}
#}
Last but not least, here are some miscellaneous things in my i3 config that I'll have to talk more about in the future, but here's a tease I guess.
#Runs Xmodmap to change keyboard settings for resetting mod key
exec if pacman -Q | grep -q "xmodmap"; then exec ~/scripts/no_terminal/keyboard.sh; fi;

#Wallpaper slideshow. Here we set the wallpaper, which will be dynamically updated with cron
exec xrdb ~/.Xresources
exec ~/scripts/themes/i3_theme_slideshow.sh
bindsym $mod+F5 exec ~/scripts/themes/themepick.sh

#Script Launcher
bindsym $mod+F2 exec ~/scripts/no_terminal/scriptstart_noterminal.sh
bindsym $mod+F3 exec ~/scripts/no_terminal/scriptstart_interminal.sh
#Unicode Character Selection
bindsym $mod+F6 exec ~/scripts/no_terminal/unicode_characters.sh

#audio keybindings
bindsym XF86AudioRaiseVolume exec --no-startup-id pactl set-sink-volume 0 +5%
bindsym XF86AudioLowerVolume exec --no-startup-id pactl set-sink-volume 0 -5%
bindysm XF86AudioMute exec --nostartup-id pactl set-sink-mute 0 toggle

#Brightness Controls
bindsym XF86MonBrightnessUp exec xbacklight +10
bindsym XF86MonBrightnessDown exec xbacklight -10

#stop windows from closing from keybinding
bindsym ctrl+q exec ~/scripts/nothing.sh

#stops screen from immediately turning off
#can check with xset q
#see https://wiki.archlinux.org/index.php/Display_Power_Management_Signaling
exec xset s off -dpms
Well first off, you look really cool when you do it. So that's gotta count for something.
So, I could make an autistic rant about why Windows, Mac, iOS, and Android are literally the cancer of the earth, but I'll spare your time for now. In essence, these are just bad software that disempowers and abuses the user. These don't allow for users to customize and control their computer, they can make certain tasks more energy than they should be, they can be inefficient, and they advertise a support system that doesn't actually exist. Some of this technology is just conspicuous consumption. The disappointing part is that we live in a society where people would rather justify their purchases or current actions than learn something new to be more efficient or to actually grow as a person.
So if mainstream software is so terrible, are the alternatives honestly better? It may seem that the people who avoid mainstream software are putting themselves at a disadvantage in that they sometimes need to spend extra effort in order to accomplish the same tasks. Thus we have a public perception that only elite hackers use Linux or terminal/text-based user interfaces. It may seem true that accomplishing some tasks may be more difficult without some familiar buttons or GUI elements that automatically map to some set of instructions. But actually, this minimalist sort of workflow can sacrifice short term speed for long term benefits. If you actually spend the time and energy to learn, you can become capable of performing the same types of tasks faster and more effectively in many cases. With this, I don't mean to sound elitist; I can't expect everyone to become experts and write their own low-level code. But it is possible to abstract high level commands wherein the average user can string together exactly what they need on a case-specific basis. Metaphorically speaking, you don't need to go out and buy a cake if the ingredients, stove, and instructions are sitting on your counter top. In this way, you can get exactly what you want every time, without having to consult the baker.
Note the point about having to consult the baker. The ideology here is about self-reliance, not anarcho-primitivism. Unlike a cake, software has a lot more utility. And with utility comes features, some of which are necessary, some of which are not. The features of software have generally expanded exponentially with the increasing power of hardware (because how else do you improve a set of instructions?). Now we're at the point where we expect a certain amount of functionality out of every program we use. If it doesn't have a specific feature I want, it must be deficient. But with these features come other features you don't want, things that may be detrimental to your privacy ...or even your brain! As a society, we've emphasized that you shouldn't have any expectation to try if automation is involved.
In my philosophy, our progress is measured in bridging the gap between an amateur and an expert, not creating stratified classes of experts and laymen. Just like science, good software is the kind that can be picked up by anyone with some expectation they can understand it at some level. The goal of progress is bringing the whole of society to a better place. And my experience in science is that the line between an expert and a layman is actually pretty thin. Yes, you have to learn some new things, but all of that information is out there. Anyone can pick it up and learn (but that doesn't mean you'll be talented). Our society instead draws the line at four years of commitment and tens of thousands of dollars of tribute. Instead, with FOSS projects, good documentation, and accessible languages, this societal progress in empowering amateurs is actually happening in the background.
So, you're into minimalism just for the sake of learning and flexing on people in class? Not exactly. FOSS and minimalist software is actually just better than the mainstream alternative in a lot of cases.
I think a lot of the success of the FOSS community stems from its commitment to the Unix Philosophy. Most importantly: